 A corner cupboard is a great way to rationally distribute room space in a small room. Also, the advantage of this furniture is that the cabinet can be assembled with your own hands, without using the services of specialists.
Corner Cabinet Assembly
Corner structures are most often chosen for small rooms or for rooms with non-standard sizes. These products differ from the classic cabinets by the design feature, and have their advantages and disadvantages.
To assemble the structure with your own hands, it is necessary to note the features of this piece of furniture:
- Before choosing a model in a certain room, you need to measure all the dimensions: width, height, depth;
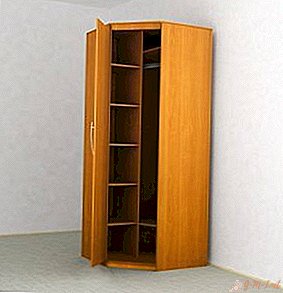
- in the corner cabinet there are four walls, in contrast to traditional products: two are located near the wall, the other two are supporting parts located on the sides;
- corner models can be equipped with sliding and swing doors;
- furniture can have a different shape.

What materials and tools are needed
The duration of operation will depend on the material used to make the cabinet. All materials are conditionally divided into two main groups:
- Fiberboard.
- natural wood.
Attention! Natural materials look more attractive, but quite expensive. Externally, these models are made in an elegant style that resembles retro. Furniture made of fiberboard is slightly worse in quality, but has a huge variety of colors. Installation of fiberboard products is much simpler.
Self-assembly of the structure will require certain tools:
- a screwdriver is required for screwing in screws and fasteners when arranging shelves;
- a punch or electric drill is required to make holes in the tree;
- a hacksaw is required to trim the material;
- a screwdriver is most often used for deep-seated screws;
- a set of hexagons is needed to fix fittings.

Important points when assembling the corner cabinet
Features of the manufacture of an angular type cabinet:
- You can rely on ready-made drawings or create your own.
- Corner products require special care during the creation of the circuit and assembly, in contrast to the classic options, so an inexperienced master may have problems. If there is not enough experience, then it is advisable to entrust the cutting of all elements to a specialist.
- In order not to assemble a smaller element, it is necessary to take into account the thickness of the saw blade.
- Wall thickness is selected not less than 20 mm. Otherwise, there will be insufficient structural strength.
- When creating a drawing, you need to pay attention to the unevenness of the floor. If it is crooked, gaps will appear between the doors. For the swing system, this can be fixed by adjusting the awnings, and for the sliding system, by changing the height of the rollers.
- Door guides must be mounted in parallel.
- Carefully you need to approach the marking and fastening of the guide rails for the boxes.
- The mirror mounting should be started by gluing the sealant along the contour.
- Laminate to fiberboard cuts is fixed with an iron.

Assembly depending on cabinet design and model
Assembling the design is quite simple, you only need to know the main points and stick to the drawings.
Before making a diagram, it is necessary to determine the shape of the future model:
- triangle;
- L-shaped;
- trapezoid.
There is also a 5-wall model.
A serious mistake is made by people who purchase low-quality rollers or do not use steel profiles because of their imaginary expensive cost.
If you need to speed up the assembly process and do the work carefully, it is advisable to order the cutting of wooden sheets in the workshop. The size of the cabinet must comply with the area of the room and the principles of filling. So, under shirts, sweaters, you need a compartment of more than 90 cm and not less than 150 cm.
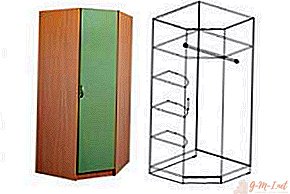
The shape of the cabinet model has almost no effect on its manufacture. First of all, metal corners are fixed, which will hold the side parts, preventing them from deviating from the level.
To assemble the frame use prefabricated elements. After they attach the guides and install the doors on the rollers.
The internal assembly of the cabinet is as important as the creation of the box.
In this case, the following work steps are performed:
- install brackets;
- fasten shelves in the required place;
- install accessories (first of all, partitions, after the hanger and the shelf, the handles are screwed on last).
Vertical partitions, setting them in the guides, must be fixed with suspensions. Do not neglect the stiffeners, the more it is necessary to install them in places where there will be shelves and drawers. Replacing the steel profile with bars is possible only in special cases, while the tree must be well-dried, otherwise the cabinet completely deforms when set.
Such an assembly scheme is also used without significant changes during the manufacture of drywall cabinets, but some differences still exist.
The initial stage of work in this case will not be the installation of the frame, but the marking of the ceiling and floor surface, taking into account the drawing. It is advisable to mark with shock-absorbing silicone tape and precisely fix metal profiles on it.
After the workpiece is installed in its place and fastened with screws (screwing them in increments of 25 cm). It is necessary to make sure that the caps go deep into the drywall by a millimeter.
Important! Do not do it yourself or order doors on the cabinet until the structure is completely ready. Otherwise, you may encounter the fact that the dimensions have changed slightly and the doors do not fit.
After that you need to take care of the priming of drywall, grouting the joints with plaster, installing corners, puttying, drying, grinding and finishing.
Step-by-step instructions for assembling a corner cabinet
Assembly of the corner cabinet step by step:
- Run the drawing, taking into account the proportions and scale. It is necessary to display all the parameters.
- Make a plywood stencil in the shape of a triangle. He will be able to help correctly draw markings, determine the boundaries of the structure and the dimensions of the doors.
- Assembly of the frame. At this stage, you must use the level. If the verticality of the structure is violated, then after a while the doors will jam or they will start to open spontaneously.
- Mounting the side parts.
- Marking the locations of shelves and racks, their fasteners.

Beginners are advised to pre-execute the layout of the cabinet from cardboard. This will make it possible to avoid inaccuracies at the design stage. Taking into account the blanks from cardboard in the future, you can order sawing parts.
Angular cabinets not only make it possible to rationally use the entire area of the room, but also are a real decoration in any room, emphasizing the taste and personality of its owner.
Leave Your Comment